Showing posts with label DZC. Show all posts

Wednesday, June 22, 2016

DZC [001u]

Finally the little buggers are done :). 


So ends the dropzone forces at this time. 

For the Aged Ones I just left off the blood red, cloak highlighting. Same scheme but a little darker and left off the squad markings on the back packs. Just gives them a bit of a different appearance and a little more grungy look.  Now on to other NOVA forces. 

Until next time :)

Monday, May 30, 2016

DZC [001t]

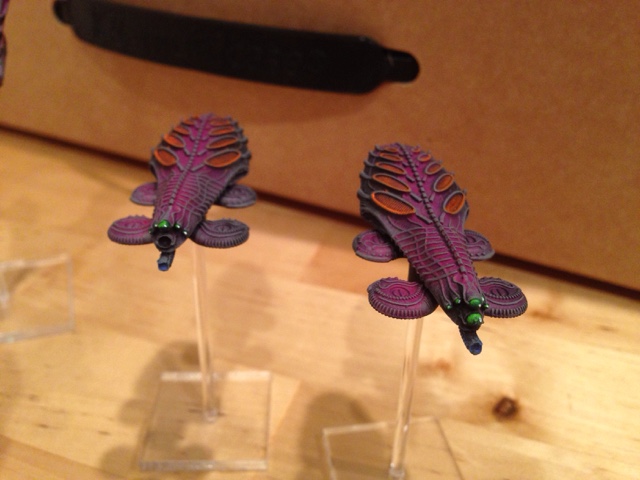
Next batch of models for final detailing. Adding the orange vents, green eye/gems, blue plasma hoses, squad markings etc. This finishes the vehicle models for my next fleet expansion. Now just have the six basic infantry bases to paint and this round is done!!


Load em up!

Friday, May 27, 2016

DZC [001s]

Just a minor update.  Finished the final details on these guys tonight. Moving pretty quickly which is nice for once. 


Wednesday, May 25, 2016

DZC [001r]

So still on that road to NOVA... Next step equals about an hour of dry brushing Dawnstone to add those metallic highlights.  I think I'll be mass producing these so that they are all done at once. So I'll be doing large chunks of one color at a time. Definitely trying to just bang these DZC guys out this month. Hopefully can finish these in May or early into June and then I'll have about three months for a few 40k dudes and a bunch of Infinity minis as well.  


Next step is orange for the louvers and engines.

Monday, April 18, 2016

DZC [001q]

So...have to add some things for a legal 1500 point force for NOVA this year.  Here's the next batch :)  Yay Dropzone!  Primed with Vallejo Black Surface Primer with the airbrush again and then two or three coats of Hexed Lichen followed by a few highlight coats of Warlord Purple. 


After this run I now find myself out of black primer and airbrush cleaner!?! Gasp! Guess it's time for another order...

Tuesday, October 13, 2015

DZC [001p]

It's done!!! Last up were the UCM Condor transports :). Been fun drop zone. Until we meet again. Now just have to get someone over to play!


I did forget that these had separate plastic clear canopies that I had to find in the original box. Then sticky tacked them to some card board for quick black primer then shades of red to white for the canopies and then some grey highlights on the black.  Not sure that the red looks the best but it kind of became my screen color on the tanks earlier so I kept it here. 


Same gray and rust for weathering and highlighting here on the bodies. But then did shades of black to blue to white for the thrusters. 


Overall it's been a good project and finished about a month earlier than my goal. Now on to the next project...maybe some of these other board games laying around with models to paint. Until next time. -Zak out


Sunday, October 11, 2015

DZC [001o]

Bear APCs and the Kodiak armored command vehicle were up tonight :). Similar techniques were used for a speedy and decent scheme to match the other tanks already painted.  

I found it interesting that the Kodiak has a very strange mold line as the bear style body in resin comes split in half, long ways. I thought about filling this earlier on but totally forgot and was stuck with this. It probably would not have filled well on the back engine area either but I think that I would have liked to fill the front part at least. Oh well. Not going back now, but just something to watch out for if anyone else decides to build one of these. I might have taken the extra bear that came with the starter set and just added the back extra pieces that came with the Kodiak kit. Easy conversion for slightly different aesthetic with the detail level on the resin model versus the plastic model but may have looked better overall. 


Saturday, October 10, 2015

DZC [001n]

Next off the line...UCM Rapier AA tanks. Same painting scheme as the Sabres. 


Tuesday, September 22, 2015

DZC [001g]

Tonight I was able to prime the UCM vehicles.  Same process as before.  I think I might have left my paint in the hot garage for a little too long or the airbrush was not quite clean because I had a bit of a slow start with the primer not smoothly coming out of the brush.  I added a few drops of Vallejo airbrush thinner (which is not ideal for primer I've heard), shook up the paint pot, and things went much smoother after that. I brought my paint back inside following tonight's episode. 

Here are the final three coat primed UCM vehicles. 


These Bear APCs above were coated with citadel chaos black primer the other day and I can definitely tell the difference in thickness of the base costs.  Here not too much of a problem but I'm glad I did the scourge with the airbrush as they are a bit more detailed than the UCM.


Lastly I sealed my infantry model bases.  I use Krylon Crystal Clear for the first coat. If you like things glossy you can stop there but most of us don't so I then hit it with Testors dull coat.  


I also used sticky tack to secure these to a piece of cardboard so they would not fly off of the table and get anything else stuck to them in the process.  Best decision of the night. 


Clear coated

Dull coated. 

Lastly I checked out some of the Scourge models and found one that chunked off some base coat on the bottom.  Just a gentle reminder to myself to wait the extra three seconds before putting these down for them to dry...does not take long with airbrush coats to dry but you can still get the wet paint stick effect so watch out. 


Now off to bed :)

Sunday, September 20, 2015

DZC [001f]

Tonight I tried out the Vallejo surface primer.  It had been a while since I last used the airbrush in general but everything seemed to go fine. I just had to remember not to rotate my hand to hit the side of a model as this defeats the purpose of the gravity feed pot. I of course did this about ten times before I corrected and would spin the model and keep the airbrush upright instead. Much better and smoother operation after that...


For the primer I found that I needed to have the paint pot like 2/3 full or it wouldn't come out in high enough volume and I'd keep having to flick the lever to get the paint to come out.  Overall I think this stuff is great for getting the small and highly detailed models, that these Scourge vehicles really are, primed well.  The vehicle models are like the opposite of the infantry. Super detailed. Very cool stuff. I hadn't really looked at these models in a while and was pleased to see them in more detail which is part of what got me hooked on this game in the first place. 

I use q-tips every ten minutes or so, with a dab of the airbrush cleaner on the end, to clean out the tip of the airbrush and that seems to be fine for prolonged periods of one color. 

In about 45 minutes I had hit all of the vehicles with a longer first coat and then two more quick costs of the primer on top. Hopefully this will be enough to not have them scratch too easily and have the paint chip. I'll of course be sealing all of these later but I want them to be ok for initial painting. 

I thought it was funny as I was hitting them the second and third time that they were skimming around my paint station accidently from the high psi coming out of the air compressor.  These are small models and I was careful to hold them in place for the later quick coats. For the initial ones latex gloves were utilized and I just held them up while air brushing. I didn't really think about this before as I've never airbrushed anything this small and my other pieces never flew around the paint station before.  I noticed this the other day when using the normal citadel black spray paint can base coat. The UCM Bear APCs shot all over the place. Even with the can like 18" above the models.  Latex gloves and holding the models while airbrushing is a must for these guys. 

Not sure if I'll prime the UCM next or start some details on the Scourge.  Stay tuned  to find out :)


I'm adding an additional section to this post to reply to a question about airbrush cleaning.  I usually hit one color hard for the night, in this case primer, then I usually disassemble the airbrush and soak the parts that get paint on them in a 25% airbrush cleaner solution (currently using Vallejo air brush cleaner) with water over night. Then in the morning I rinse them all down again and let them air dry all day while I'm at work. They are then ready to go again that night when I usually paint. 


For cleaning during the airbrushing I just dip a q-tip in cleaner and swipe inside the tip shield cover every ten minutes or so, like I said above, so I don't get excess paint splatter. I have not really painted to switch colors a bunch during one session as I usually do large amounts of one color at a time.  When I have been painting for more than an hour you can rinse the paint pot with water, then 100% cleaner shake it up and dump out separately. Then spray the airbrush with the cleaner in the paint pot to clear out the needle passageway until only air comes out. Then you are ready for another color. Again I don't do this too much because I find it a pain with my gravity fed paint pot. For the other bottom feed pots this is a little easier if you want to switch colors a bunch I think.  If anyone has a good system for switching colors with the gravity fed pot it would be much appreciated for this upcoming project.